vivmaughn13's Blog

4 out of 5 dentists recommend this WordPress.com site

Three party recipes to impress your guests!

With all the thought of other peoples birthdays recently, i had completely forgotten about mine up until a few days ago. My birthday is in less than three weeks away and I am having about 40 or so people over to my house to celebrate.

Because there will be so many people I won’t be providing full meals, only little snacks and party food which people are able to just grab at when they feel peckish.
I want my party food to be colourful, delicious but also impressive. I’ve been in search of pretty, easy to make, party foods which can be made the night before!

So since my last post on the beautiful rainbow cupcake recipe, I’ve been inspired in looking for some new colourful and sweet recipes for parties.

The first recipe I found that I loved, well, is so basic it isn’t much of a recipe at all actually! It’s one of the simplest things to make, and looks so pretty and colourful.
20130216-002432.jpg
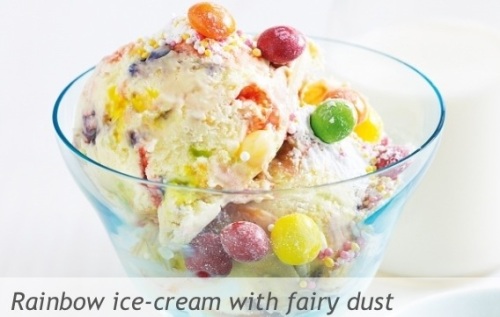
RAINBOW ICE-CREAM WITH FAIRY DUST
MAKES 8
• 2 litres vanilla ice cream
• 250g packet skittles
• 12.5g packet wizz fizz
• 2 tablespoons 100’s and 1000’s

method:
1. Set ice cream aside in a large bowl to soften for about 15 minutes.
2. Roughly chop some of the skittles (so they aren’t all in big pieces) or put in food processor and pulse.
3. Using a large wooden spoon, fold skittles through ice cream until just combined (do not over stir or skittles colours will bleed)
4. Spoon ice cream mixture back into container and cover with lid. Put in the freezer to freeze over night.
5. Make fairy dust: combine wizz fizz and 100’s and 1000’s in a bowl.
6. Scoop ice cream into a bowl and generously cover with pre-prepared fairy dust.
– One of the best parts of this recipe, is that you can add whatever you want to your ice cream to flavour it however you like!

The next recipe I have chosen is a quick drink recipe which is so simple and colourful and can be improved and changed in an endless amount of ways!

20130221-215319.jpg

COLOURED SPIDERS
MAKES 4
• 8 scoops vanilla ice cream (or any other flavour you like)
• 1 litre soft drink (lime for green, raspberry for red, grape for purple etc.)
• 8 coloured snake lollies
• whipped cream (optional)

method:
1. Place 2 scoops of ice cream in each glass.
2. Top each glass with chosen soft drink.
3. Hang 2 coloured snake lollies over the edge of each glass.
4. Add a bendy straw and finish with a swirl of whipped cream if desired.

My third recipe I have chosen is a bit more complex than the previous two, and therefor takes a bit more preparation and effort to make. This cake looks absolutely amazing and with its and will definitely impress!

20130221-222538.jpg

SCIENCE EXPERIMENT CAKE
MAKES 1
• pre baked cake of your choice (chocolate mud cake is a good one!)
• 1 litre of lemonade
• 1/4 cup powdered gelatine
• 10 red frog lollies
• 5 blue snake lollies
• 250 grams softened butter
• 3 cups icing sugar mixture
• 2 tablespoons milk
• coloured gel food colour

method:
1. Make radio active jelly: grease and 8 cup capacity pudding steamer with oil. Heat lemonade in a saucepan over medium heat for 3 minutes or until warm. Transfer to a heat proof bowl, sprinkle over gelatine and whisk until dissolved.
2. Strain gelatine mixture into prepared pudding steamer. Cover and refrigerate for approx. 1 hour and 30 minutes or until thick and syrupy. Add frogs and snakes. Cover and refrigerate overnight to set.
3. Make buttercream icing: using an electric mixer, beat butter until pale and fluffy. Gradually add icing sugar mixture and milk, beating constantly until combined. Tint with food colouring.
4. Place cake on a board or large plate. Cover top and sides of cake with buttercream icing. After the icing sets a little (about 5 minutes in the fridge) place the jelly on top of the cake.
– I found the best way to do this was to tip it upside down onto a piece of baking paper, then when places on the cake lift the jelly and peel/roll back the paper until it is completely out.
5. Decorate the edges with jelly babies.

Rainbow cupcakes with rainbow frosting

So, in the past year most of my friends have been turning 18 (give or take a few years) and to celebrate, have been having large gatherings and parties.
These events are almost always the kind where the host tells you ‘don’t bring anything!’

You know the kind;
The ones where you rush to the supermarket in a desperate attempt to find something you can take along to show you didn’t make an effort.
Or the opposite kind where you rummage through all your dessert cookbooks in order to find something extravagant you can take to show that you did make an effort.

It’s an unspoken rule to take something along for the host when you’re invited to a gathering, right? But what can you take? If everyone has the same idea, the host will end up with a pyramid made of boxes of chocolates. But then again you don’t want to spend the entire day before baking a three layered, triple toned, ganache smothered cake either.

I’ve got the perfect in between recipe.

Rainbow cupcakes are simple enough to make the same day as the event, and look like they’ve taken a lot more time and effort to make than they actually have. They are so easy to make but will easily amaze and impress all your friends and family.

20130214-213024.jpg

For the rainbow cupcake, I used a recipe I found on another blog (a link to this blog will be posted at the bottom of page) but as I made these cupcakes I made some adjustments, that I thought worked better, to the original recipe.

RAINBOW CUPCAKES
MAKES 12
•1 box of white cake mix
•3 egg whites
•1/2 cup unsweetened applesauce
•1 cup water
•1 small box sugar free/fat free instant vanilla pudding mix
•Gel food colours (yellow, green, blue, purple)
•Liquid food colouring (red)
-You may also use orange colouring if you like.

method:
1. Preheat oven to 150 degrees C. Line one cupcake tray with paper cupcake pans, And put aside for later.
2. Beat together cake mix, egg whites, applesauce, and water until combined, Which should take about 2 minutes. Stir in vanilla pudding mix until Well combined.
3. Evenly divide batter among five separate bowls.
4. Color each bowl of batter a different color, using your gel food colorings. I like using a liquid red coloring because it’s much easier to add to enhance the color as opposed to the gel colorings, but use what you have on hand. For the gel colors, I generally use about the tip of a butter knife’s worth of coloring; it’s highly concentrated, so that’s usually enough for a small amount of batter. Tint each color to your desired shade (I like mine nice and bright!) and set aside.
5. Spoon your batter into your muffin cups one color at a time. Start with a dessertspoonful of purple batter and put that into the bottom of the cupcake pan, shake the cupcake tray to make sure the purple covers the bottom of the cupcake pan it’s in. Then put a spoonful of blue on top of the purple, then a spoonful of green, then a spoonful of yellow, then a spoonful of red for the top.
-To vary it a bit you can also start with red on the bottom and have purple as the top colour.
6. Once your cupcake pans are filled (after the red layer, or purple if you’re doing a reverse rainbow) put in the oven for about 15-18 minutes or until you can insert a toothpick in the centre and pull it out without any batter sticking to it.
7. Take cupcake pans out of the tray and set aside on a wire rack to cool.

RAINBOW BUTTER CREAM ICING
•150 grams butter, softened
•250 grams icing sugar, sifted
•2 teaspoons vanilla extract (or more, to your desired taste)
•2 teaspoons milk
•Gel food colours in yellow, blue and pink.

method:
1. Blend butter until light and fluffy, which should take about 5 minutes.
2. Continue blending while slowly adding icing sugar, small amounts at a time.
3. Add the vanilla extract and milk slowly, small amounts at a time.
4. Continue mixing for a further 5 minutes.
5. Separate equally into 3 bowls.
6. Tint one bowl pink, one yellow and one blue. (You only need a tiny amount of gel colouring)
7. Take it in turns of spooning pink then yellow then blue icing side by side into a piping bag. (Star nozzles look the best and give the best colour mixing effect)
8. The colours will combine by themselves as you pipe a tall swirl onto your beautiful cupcake to finish it off!

EXAMPLES OF RAINBOW CUPCAKES

20130214-214224.jpg

20130214-213516.jpg

20130214-213524.jpg

EXAMPLES OF RAINBOW FROSTING

20130214-214521.jpg

20130214-214533.jpg

20130214-214604.jpg

EXAMPLES OF THE TWO COMBINED

20130214-214901.jpg

20130214-214944.jpg

20130214-215051.jpg

Here’s the link to Hayley’s blog where I got the rainbow cupcake (not the rainbow frosting) recipe, and also two of the pictures from:
http://thedomesticrebel.com/2011/09/29/amazing-rainbow-cupcakes-pt-deux-and-a-video/<a